Overview
In motion graphics, we often need to setup an object that follows a path. An example is an arrow head with a trail that moves from point A to point B. We can approach this in a number of ways. The most popular might be drawing a path first, then copying the path value to the position property of the arrow. This works well but as soon as you alter the path shape you have to repeat the copy/paste action. It becomes more tedious when you start animating the path shape or when you have a multitude of arrows; each following their own path. Since AE 2017 (Oct. 2017 release) we got introduced to a few more efficient ways to approach this task...
Using Trace Path
One way is through a nifty plugin (that comes with AE) called Create Nulls From Paths. Located in the Menu bar -> Window -> Create Nulls From Paths. There are currently 3 features available. The first one, as its name suggests, is to create a Null point at each anchor point of your chosen path. The path points are then parented to their respective Null's position. The second feature allows you to choose the inverse: where the Null's follow the path points. Finally, there is an option called Trace Path that is what we are interested in.
To work, you simply select your path, then choose Trace Path. This will create a Null that has its position constrained to the path you chose. It features a handy slider named Progress that you can access in the effects panel of the Null layer. Progress controls the flow of the Null along your path where 0% is the beginning, and 100% is the end of your path. Pretty straightforward! You also have a Loop checkbox option that allows the progress animation to loop the set keyframes. This works by toggling a loopOut('cycle') expression. You can see this if you toggle the expression panel of the progress control in the timeline.
//Expression applied to Null's "Progress" Slider
if(thisProperty.propertyGroup(1)("Pseudo/ADBE Trace Path-0002") == true && thisProperty.numKeys > 1){
thisProperty.loopOut("cycle");
} else {
value
}
All this expression is doing is verifying whether the Loop checkbox is checked == true and that there are at least 2 keyframes set in the timeline numKeys > 1. If both are true then the loop is activated.
The remaining two properties that are controlled by expressions are position and rotation.
//Null Position Expression
var pathLayer = thisComp.layer("Path");
var progress = thisLayer.effect("Pseudo/ADBE Trace Path")("Pseudo/ADBE Trace Path-0001")/100;
var pathToTrace = pathLayer("ADBE Root Vectors Group")(1)("ADBE Vector Shape");
pathLayer.toComp(pathToTrace.pointOnPath(progress));
The position of the Null, relative to the path, is calculated using the pointOnPath() method; that returns the position of a point on the path based on a range of 0 to 1, where 0 is the position of the curve point at the beginning of the path, and 1 is the position of the curve point at the end of the path. To track progress of the flowing object, a percent scale is used for convenience, so the value passed as an argument to the pointOnPath() method must then be divided by 100 - to conform to the accepted range of 0 to 1.
//Null Rotation Expression
var pathToTrace = thisComp.layer("Path")("ADBE Root Vectors Group")(1)("ADBE Vector Shape");
var progress = thisLayer.effect("Pseudo/ADBE Trace Path")("Pseudo/ADBE Trace Path-0001")/100;
var pathTan = pathToTrace.tangentOnPath(progress);
radiansToDegrees(Math.atan2(pathTan[1],pathTan[0]));
The rotation property of the Null, at the specified progress time, is calculated by finding the inverse tangent (arctangent) of the path point using Math.atan2(), and then converting the result to degrees using the radiansToDegrees() function. In the next section we'll build a custom example to better understand how the math works and have a more customizable setup.
Animated Arrows
In a similar way to the Trace Path, we can setup objects to flow along the path as the path draws itself. Let's build an example with animated arrows. We'll be using a set of expressions that give us direct control over path points.
Setup
- Create a new comp at whatever size you prefer.
- In the new comp create a Layer > New > Shape Layer. Make sure its position is set to
0,0. Rename this layer to: "Path". - Draw a path with the pen tool (
gkey) while having the new Shape Layer selected. Once you are done, a group will be created in your shape layer contents that contains your path, a fill, stroke, and a transform. To simplify our example, drag your path and stroke out of the group and rename them to "Path", and "Stroke" respectively. Set your stroke width to a reasonable size for better visibility. - Next add a Trim Path to your shape layer.
- Now onto the Arrow shape. Create a Layer > New > Shape Layer. Rename this layer to: "Arrow".
- Within the shape layer contents add a Polystar Path shape. In the attributes of the polystar path set the following values:
- Points: 3
- Inner Radius: 20
- Outer Radius: 40 - Next add a Fill to see your arrowhead.
Path Follow
We want the arrowhead to follow the path as it is drawn. To do this we need to add the following expression to the position property of the arrowhead:
l = thisComp.layer(index+1);
lp = l.content("Path").path;
lt = l.content("Trim").end/100;

lp.pointOnPath(lt);
In our example, the arrow layer is at the top in our timeline, followed by the path layer. We are therefore using index+1 to reference the path layer. The pointOnPath() method returns a specific point on the specified path. The specific point can be anywhere in the range of 0 and 1. Since we want the arrowhead to follow the path being drawn we can use the Trim End property of the Trim content as a controller. This property has a value range of 0 to 100, so we need to convert the scale by dividing the value by 100 - to conform to the 0 to 1 range requirement of the pointOnPath(0 - 1) method.
We now should have the arrowhead positioned correctly at the tip of the path and if we change the value of the Trim end property, we should see the arrowhead moving along the path.
Next step is to calculate the rotation so that the arrowhead always points forward relative to its motion. The result is similar to the Auto-Orient feature available in AE: select an item, then right click and go to Transform -> Auto-Orient. Since we don't have much control over this feature, let's add our own expression to the rotation property of the arrowhead:
l = thisComp.layer(index+1);
lp = l.content("Path").path;
lt = l.content("Trim").end/100;
t = lp.tangentOnPath(lt);

radiansToDegrees(Math.atan2(t[1],t[0]));
As for the position expression, we are referencing the layer below. This time, instead of the pointOnPath(), that returns the position, we use the tangentOnPath() method, that returns the tangent to the point. The tangent is used to find the angle that defines the rotation of our arrowhead. To calculate this we use the Math.atan2() method (that stands for 2-argument arctangent). As the name suggests, we'll plug into it the result of the tangentOnPath() method. Refer to the diagram below for a visual representation. Note: Math.atan2() is a method that is part of the Javascript "Math" object. Link in the Additional Resources section at article bottom.
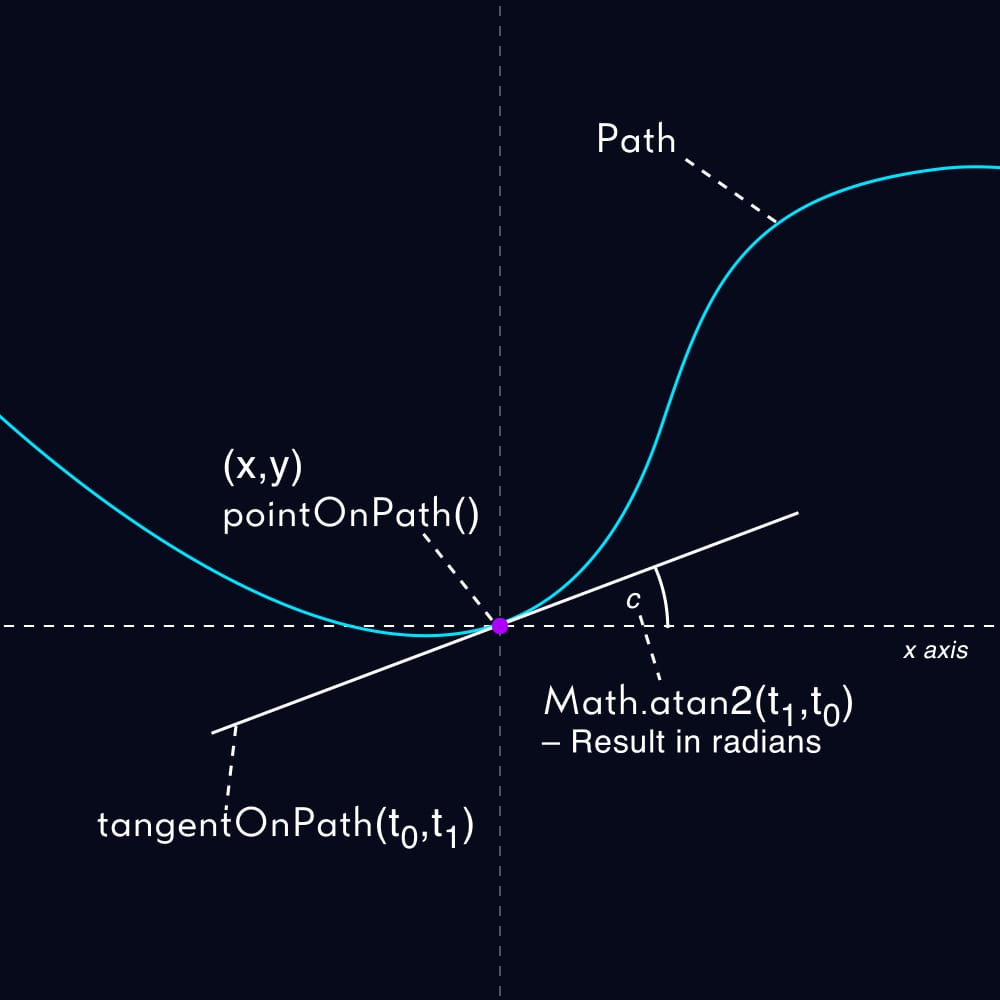
The result we obtain from the Math.atan2() method will be in radians. To have After Effects interpret the correct rotation we need to convert this value to degrees. We'll use the built-in radiansToDegrees() method to convert radians to degrees.
Now if you are following along with the example, the arrowhead will not be pointing towards the direction of motion, so we need to offset its rotation. In our case by 90° clockwise. So in the Arrow polystar shape, set the rotation value to 90.
When changing the Trim Path End property value from 0 to 100, you should see the path draw itself while the arrowhead leads.
Additional Resources
AE Expressions Reference - here you can find the reference to every expression method we used:
http://expressions.aenhancers.com
Explanation and examples of the LoopOut() method:


List of all Javascript Math methods, including Math.atan2():

Adobe help for the Create Nulls from Path panel:
