Overview
In this part of our AE Grid Series we’ll cover the setup of a responsive grid that automatically adjusts to the width and height of the comp. The items of the grid will scale horizontally and vertically to always fill the size of the comp. We’ll set up controls so that we can resize the grid dynamically based on the amount of rows and columns we specify.
Initial Setup
- Open After Effects and create a
1000pxsquare comp. - In the new comp create a Layer > New > Shape Layer. In the shape contents add a new Rectangle and a new Fill.
- Create a Layer > New > Null Object. This will be our control layer. Rename it to something useful like "Grid Control". Note: Depending on your grid size, this layer will easily disappear down the layer stack as you duplicate your shape layers, so let’s ensure it sits at the top for accessibility.
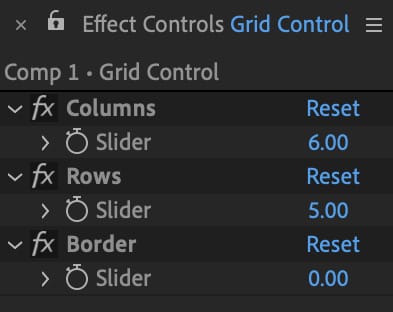
- With the new Null selected, add 3 new Slider controls from the effects panel, rename them as follows, and set these values:
- Columns: 5
- Rows: 5
- Border: 10
Additional Step - Random Colors
This is an extra step where we’ll assign a different random color to each shape layer in our grid, as in our example. This will help us visualize our grid better.
In the Shape layer’s Fill color property add the following expression:
seedRandom(index, true);
r = random();
hslToRgb([r, 1, .5, 1]);
With this expression we are automatically assigning a solid color with a random hue to the Fill. The random seed is defined by the layer’s index so that each layer will have a different random seed, hence a different color hue.
The random() method generates a random number between any specified values inserted within the parenthesis. If no values are specified, the default is a random number generation between 0 and 1 — ideal in our case since the accepted range in our color conversion method is 0 to 1.
The seedRandom() method fixes the random number, preventing the default behaviour of generating a new random number on every frame. Note: This method needs to be declared before the random function is called.
Finally, the hslToRgb() color conversion method allows us to work with hue, saturation, and luminosity values that are then converted to rgb values — required by the interpreter.
Building the Grid
- Anchor Point: Select the Shape Layer and toggle the expression field for the anchor point. Add the following expression to lock the anchor point to the center of the text layer:
l = thisLayer.sourceRectAtTime();
[l.left + l.width/2, l.top + l.height/2];
Note: Locking the anchor point is necessary to prevent any offsets. No matter the changes we make to the shape later on (e.g. size, position offset, etc.), the layer will remain in place. You can read more about how this expression works here: GFX Hacks: Anchor Point Expressions.
- Position: Toggle the position expression field and add the following:
columns = thisComp.layer("Grid Control").effect("Columns")("Slider");
rows = thisComp.layer("Grid Control").effect("Rows")("Slider");
border = thisComp.layer("Grid Control").effect("Border")("Slider");

w = thisComp.width / columns;
h = thisComp.height / rows;

x = w * ((index - 2) % columns) + w/2;
y = h * Math.floor((index - 2) / columns) + h/2;

[x, y]
- Shape Size: In the shape contents, find the Rectangle Path, then toggle it's Size expression field and add the following in there:
columns = thisComp.layer("Grid Control").effect("Columns")("Slider");
rows = thisComp.layer("Grid Control").effect("Rows")("Slider");
border = thisComp.layer("Grid Control").effect("Border")("Slider");

w = thisComp.width / columns;
h = thisComp.height / rows;

x = w - border;
y = h - border;

[x, y]
- That's it! Now duplicate the Shape Layer however many times you want and you'll see the shapes fill the comp, correctly positioning and scaling themselves automatically based on the slider values we set in the Grid Control. By changing the slider values, the grid will dynamically readjust to the new values, always filling the comp. Additionally, try changing the width and height values of the comp. As soon as you hit enter, the grid will readjust automatically to fill the new size.
Note: As we duplicate the Shape Layers, they start to fill the comp's width from left to right. To have them fill the comp height from top to bottom instead, simply invert the [x, y] values in both the Position expression, and the Shape Size expression: [y, x].
Note: The more the items in the grid, the slower AE will get so watch out!
How It Works
What's going on here? Let's look at the size expression.
In the first three lines of the expression we are simply linking to the slider controls we created earlier. Note: Make sure to change the paths (or use the pickwhip) if you named those sliders differently than in this example.
columns = thisComp.layer("Grid Control").effect("Columns")("Slider");
rows = thisComp.layer("Grid Control").effect("Rows")("Slider");
border = thisComp.layer("Grid Control").effect("Border")("Slider");
Next we calculate the width and height of the shape based on the number of rows and columns we defined in our slider controls. In our example:
w = thisComp.width / columns;
h = thisComp.height / rows;
To calculate the width and height we simply divide the height and width of the comp by the specified rows and columns, respectively. Let's assume we have a comp that is 1000px in width and 2000px in height. If we were to specify 5 columns, each column would then be 1000px / 5 = 200px in width. If we were to specify 4 rows, each row would then be 2000px / 4 = 500px. Each of our shapes would be 200px wide and 500px tall: [w, h] = [200, 500].
Finally we calculate the border offset. In our example, the border is created from sizing down the shape layer, revealing the layer underneath it. We subtract uniformly the specified border value from the previously calculated width and height:
x = w - border;
y = h - border;
There is a detailed explanation of how the positioning algorithm works in the Dynamic Number Grids article of our AE Grid Series:
 Dan
Dan
Additional Steps - Clamping Values
columns = clamp(thisComp.layer("Grid Control").effect("Columns")("Slider"), 1, thisComp.width);
rows = clamp(thisComp.layer("Grid Control").effect("Rows")("Slider"), 1, thisComp.height);
border = thisComp.layer("Grid Control").effect("Border")("Slider");
Additionally we can clamp the values of the sliders using clamp(). This is useful to set limits to the values we want to allow being specified. The arguments inside the parenthesis specify the value to be clamped, followed by the range limit: clamp(value, min, max). Any value that falls above the max value will be clamped to the max value. Similarly, if a value falls below the min value, it will be clamped to the min value. A quick example is if we have min = 1 and max = 3 so that: clamp(value, 1, 3), if we then have a value of 3.5, that value would be clamped to 3. Alternatively, if we had a value of -4, that value would be clamped to 1.
Another reason we can use clamps is to avoid errors. We cannot have a grid with zero or negative columns so we can prevent this by setting the min to 1. That 1 column will take the full width of the comp. The max is instead set to the comp width. Since the width is measured in pixels, we allow a grid to have a maximum of columns based on the pixel width of the comp, meaning that the shortest width a column can be is 1px. In our example we have a 1000px wide comp. Our clamp ensures that we limit our number of columns to 1000, thus each of the 1000 columns will be 1px wide. There is no rule for clamps, so it's solely based on your needs.
Additional Resources
For building dynamic grids in After Effects, check out:
DanFor building dynamic sliding grids, see:

Further reading on anchor points:
Dan
Further reading on the Random() method:


Other articles in our AE Grid Series:
Dan 8 Dec 2019 • 9 min read