Overview
Often times we need to position elements in a grid. Maybe a sequence of images or videos, or a pattern. If we set out to do it manually, it can quickly become a pain. Even though After Effects allows you to calculate basic algebra in any numerical input field, facilitating manual positioning, it becomes incredibly tedious when faced with hundreds of items. In this part of our AE Grid Series, we’ll go over a method to setup a basic grid of items using expressions, enabling us to make instant changes to the grid layout using custom controls.
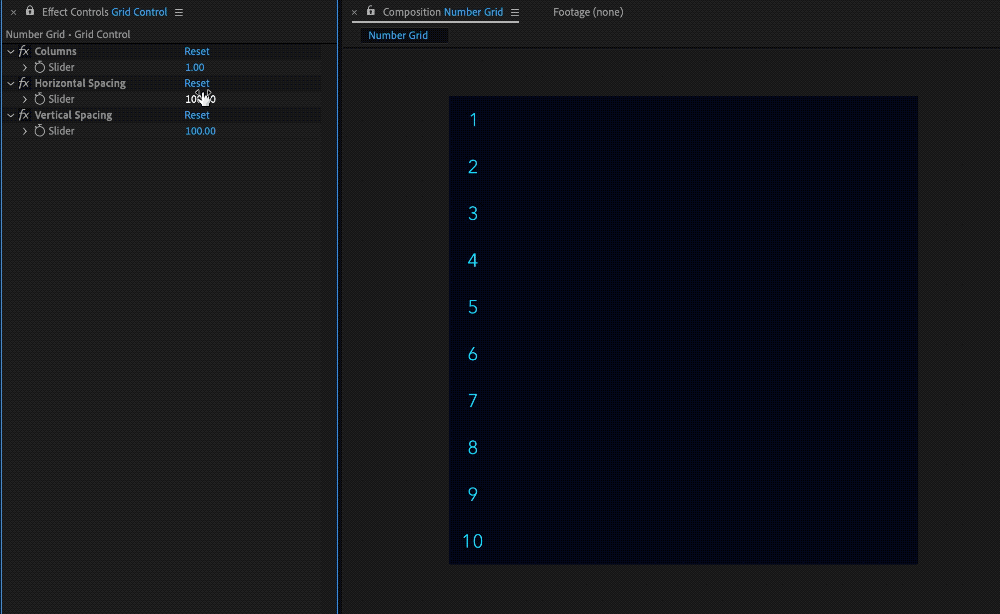
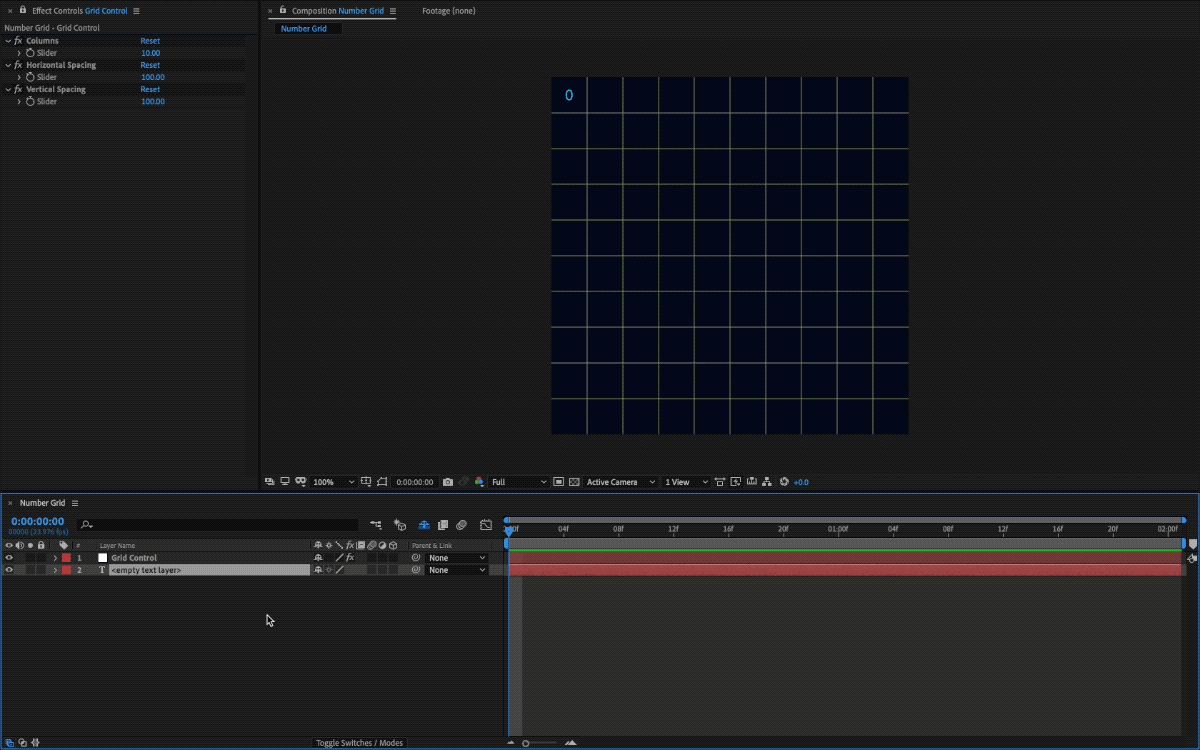
Here's an example of what we are going to build, but you can apply this technique to any layer you want:
Let’s get started!
Initial Setup
We are going to build a grid of numbers that will help us visualize what we are doing.
- Open After Effects and create a
1000pxsquare comp. - Create a Layer > New > Null Object. This will be our control layer. Rename it to something useful like "Grid Control".
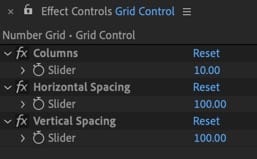
- With the new Null selected, add 3 new Slider controls from the effects panel, rename them as follows, and set these values:
- Columns: 10
- Horizontal Spacing: 100
- Vertical Spacing: 100
Building The Grid
- Create a Layer > New > Text and place it below our Grid Control layer.
- Go to the text source of the new text layer, toggle the expression field, and type
index-1. Note:indexreturns the layer position within the comp. We want our grid to start with1but the current index is2since the first layer is our Null controller. We therefore need to subtract by 1. - Now toggle the expression field for the anchor point and add the following to lock the anchor point to the center of the text layer:
l = thisLayer.sourceRectAtTime();
[l.left + l.width/2, l.top + l.height/2];
Note: Locking the anchor point is necessary to prevent any offsets. No matter the changes we make to the text later on (e.g. size, paragraph alignment, word length, etc.), the layer will remain in place. You can read more about how this expression works here: GFX Hacks: Anchor Point Expressions.
- Now for the main part, toggle the position expression field of the text layer and insert the following:
col = thisComp.layer("Grid Control").effect("Columns")("Slider");
sp_x = thisComp.layer("Grid Control").effect("Horizontal Spacing")("Slider");
sp_y = thisComp.layer("Grid Control").effect("Vertical Spacing")("Slider");

x = sp_x * ((index - 2) % col) + sp_x/2;
y = sp_y * Math.floor((index - 2) / col) + sp_y/2;
[x,y]
- Duplicate the text layer as many times as you want. Based on the values we gave to our sliders in the Grid Control, you'll see that with every new item the position is offset by
100pxon thexaxis up to the 10th item. The 11th item is then placed under the 1st item with an offset of100pxin theyaxis. And so on... Play around with the slider controls to see the changes in real time. Note: The more the items in the grid, the slower AE will get so watch out!
Read on if you're interested in the math. Every step is explained...
How It Works
What's going on here? In the first three lines of the expression we are simply linking to the slider controls we created earlier. Note: Make sure to change the paths (or use the pickwhip) if you named those sliders differently than in this example.
col = thisComp.layer("Grid Control").effect("Columns")("Slider");
sp_x = thisComp.layer("Grid Control").effect("Horizontal Spacing")("Slider");
sp_y = thisComp.layer("Grid Control").effect("Vertical Spacing")("Slider");
The next two lines cover the math for the grid, where the x variable holds the horizontal position, and the y variable holds the vertical position.
x = sp_x * ((index - 2) % col) + sp_x/2;
y = sp_y * Math.floor((index - 2) / col) + sp_y/2;
To better understand how this works we have to look at the grid as rows and columns.
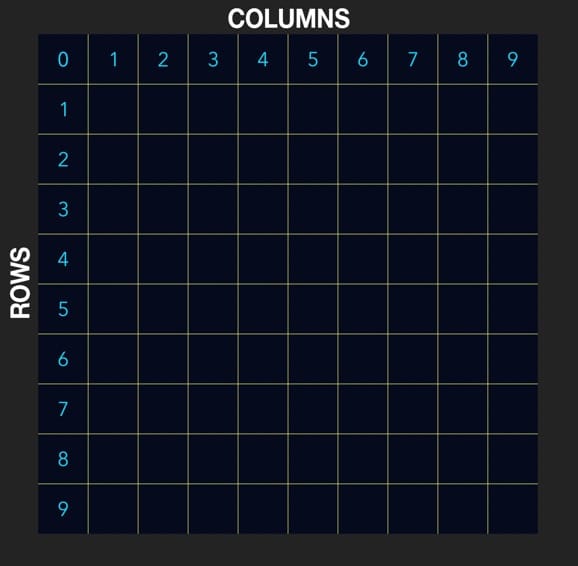
Note: If you want to follow along with the explanation you can modify the text source expression so that the grid of numbers starts at 0 instead of 1. Simply subtract the index by 2: index-2.
Horizontal Spacing (Columns)
x = sp_x * ((index - 2) % col) + sp_x/2;To calculate the x position of each item we multiply our defined horizontal spacing by the layer's index. Since our text layer is below the Grid Control Null, it's index is 2. But we want the first index to be 0 as that is the starting position of our grid both in x and y, so that [x,y] = [0,0]. To achieve this we simply subtract 2 from our layer's index: index - 2. So in our example, we've set our horizontal spacing slider at 100. If we therefore multiply the first item's index (now index 0) by 100 the result is 100 * 0 = 0. The second item's x position will be 100 * 1 = 100. The third item's x position will be 100 * 2 = 200, etc.
This is what we have so far:
x = 100 * (index - 2);
![Each new item is offset by 100px in the X axis, starting from [0,0].](https://gfxhacks.com/content/images/2019/12/Screen-Recording-2019-12-07-at-16.20.10.2019-12-07-16_22_30.gif)
The position of the first item is [0,0] but as a result, it partially falls outside the comp in both axis. Let's correct this with an offset, using our defined horizontal spacing. In our example, since we fixed our text layer's anchor point at it's center, we actually calculate the spacing to span 50px on either side of the anchor point, totalling 50px + 50px = 100px. So we only need to offset by a half of our horizontal spacing value (from the left margin). So now we have:
x = 100 * (index - 2) + 100/2;

Great! Now we can keep duplicating our text layers, but we'll encounter a problem... The items, after the 10th one, keep being pushed in the x position past the comp width. In fact, the 11th item's position x (after the offset) will be 100 * (index - 2) + 100/2 = 100 * 10 + 50 = 1050 — greater than the current comp width of 1000px. We need those items to wrap back to the next row after the last column is reached.
That's where the modulus operator comes in: %! In essence, it allows us to find the remainder of a division. An example is if we want to find the remainder of 10 / 4. The closest integer to 10 that is less than 10 and divisible by 4 is 8 (8 / 4 = 2). If we subtract the product from our dividend we get the remainder: 10 - 8 = 2.
In our example we've set the number of columns at 10 — this number is our dividend. This operation is useful to us since the results always wrap. So once the 10th item is reached: (11 - 2) % 10 = 9 the 11th item will wrap back to 0: (12 - 2) % 10 = 0.
The modulo operation in detail
In computing the modulo operation, represented by the percent % symbol, actually represents this equation: a - floor(a / b) * b. So in our example, when calculating the remainder of the 10th item (with index 11 - 2 = 9), we use: 9 % 10 = 9 - floor(9 / 10) * 9.
The floor() method rounds down the content of the parenthesis (called arguments), so we get: floor(9 / 10) = floor(0.9) = 0. In conclusion, the result is: 9 - 0 * 9 = 9.
Note: due to the order of operations in algebra, where the multiplication is prioritized over the subtraction, this equation should be read as: 9 - (0 * 9) = 9.
So for the 11th item (with index 12 - 2 = 10) the remainder is: 10 % 10 = 10 - floor(10 / 10) * 10 = 10 - (1 * 10) = 0.
If we duplicate the text layers now we won't notice a difference after the 10th item as they then start to overlay each other. Let's move on to the vertical spacing to separate the rows.
Vertical Spacing (Rows)
y = sp_y * Math.floor((index - 2) / col) + sp_y/2;Calculating the y position works similarly to calculating the x position: by using the index of the layers to step increment the spacing.
Let's commence by multiplying our defined vertical spacing by the layer's index, and applying the offset — this time from the top margin.
y = 100 * (index - 2) + 100/2;

What we get is a diagonal since the vertical spacing value is directly multiplied by the index, that increments with each layer: 100 * 0 = 0, 100 * 1 = 100, 100 * 2 = 200, and so on...
To correct this we need to divide the index by the number of columns. This way we get 100 * (0 / 10) = 100 * 0 = 0 for the first layer (index 0), 100 * (1 / 10) = 100 * 0.1 = 10 for the second layer (index 1), etc...
This causes a 10px step increment in the y position with every new layer, so we still get a diagonal pattern. What we want is to force the step to happen on every 11th item instead of on every single item. We accomplish this by using the floor() function to round a decimal value down.
Note: Notice the Math before the method floor(). Math is a Javascript object that holds a variety of maths methods. Since floor() is a method that belongs to Math we have to specify both in that order. For a complete list of supported functions see: Mozilla Developer Network - Math
In our example we'll use this function to round down the decimal results that we get from dividing the index by the number of columns. In practice, we now have Math.floor(0.1) = 0 for index 1, Math.floor(0.2) = 0 for index 2 and the result will be 0 for every other layer until the 11th. In fact, for layers 1 to 10, the decimals we get from dividing the index by the number of columns are: 0.0, 0.1, 0.2, 0.3...0.9 — each of those rounded down will result in 0. Dividing with the 11th layer's index instead (index 10), we'll get 10 / 10 = 1.0, so from there until the 20th layer (index 19 where we get 19 / 10 = 1.9, the y position will always be 100 * Math.floor(1.0...1.9) = 100px. From index 20 to 29: 100 * Math.floor(2.0...2.9) = 200px, and so on...
y = 100 * Math.floor((index - 2) / col) + 100/2;
Conclusion
We've looked at how to quickly build a dynamic grid of items using the power of expressions in After Effects. You can apply those expressions to any type of layer, although in our example, the spacing will be the same for each item. In our next AE Grid Series article, we'll explore how to create responsive grids, that adjust their size to always fill the comp — creating a mosaic.
Additional Resources
Further reading on anchor points:
 Dan
Dan
Understanding the modulus operator:

List of all Javascript Math function, including Math.floor():

Other articles in our AE Grid Series:
Dan 8 Dec 2019 • 9 min read