Overview
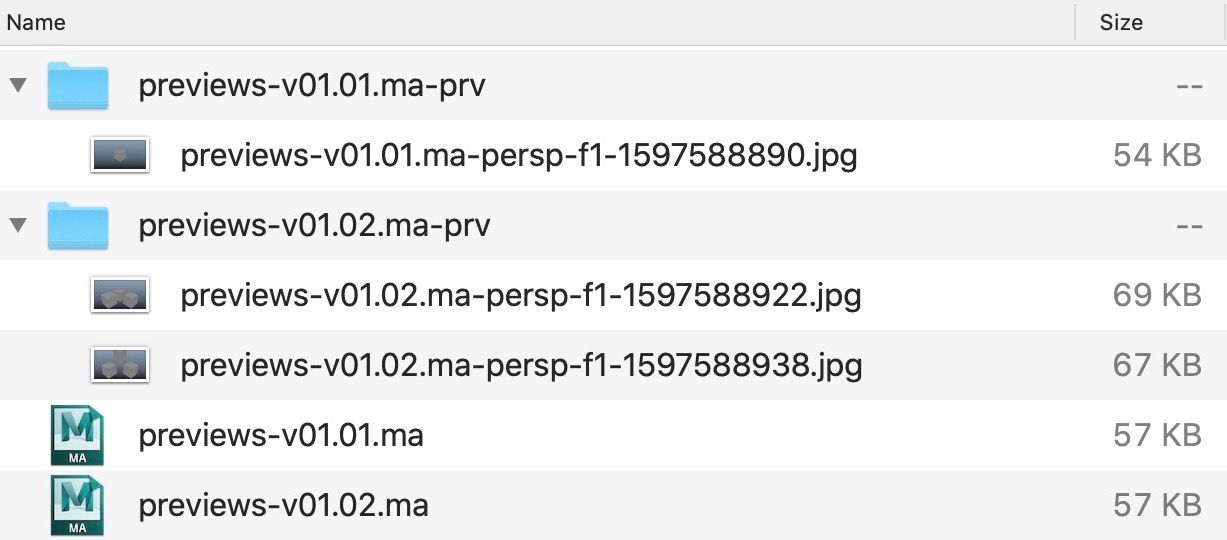
As you are working on your Maya scene, you may encounter moments that are worth taking a snapshot of: for reference, to track your progress, or for versioning - as you save different versions of your scene, you can quickly browse through the previews instead of opening the project.
Here is a simple python script that you can use to take snapshots of your active viewport, by leveraging Maya's playblast feature. The previews are then saved in a folder next to your current scene file.
The script is available below and on our Github page here:
 gfxhacks
Keep reading for a Code Overview or, to use it right away, simply paste the script below in a new shelf item directly in Maya: Creating Shelf Items.
'''
Name: scene-preview.py
Version: 1.0.0
Author: gfxhacks.com
Desc: Captures and saves a scene preview based on the active viewport, at the current frame. Uses playblast feature.
'''

import maya.cmds as cmds
import os
import time

# set screenshot dimensions
width = 960
height = 540

# get active viewport panel
panel = cmds.getPanel( withFocus=True )

# throw error if active panel is not a viewport
if "modelPanel" not in cmds.getPanel(typeOf=panel):
	cmds.confirmDialog( title='Error!', message='Please select a viewport panel first.', button=['Ok'], defaultButton='Ok', dismissString='No' )
	raise RuntimeError('Error: Please select a viewport panel, then try again.')

# get current frame number
curFrame = int(cmds.currentTime( query=True ))

# get name of current file
scName = cmds.file( query=True, sn=True, shn=True )

# get path of current file
scPath = cmds.file( query=True, sn=True )

# set new path where previews will be saved to
path = scPath + "-prv/"

# get name of current camera
cam = cmds.modelEditor( panel, query=True, camera=True )

# get current timestamp
ts = int( time.time() )

# construct full path
fullPath = "{}{}-{}-f{}-{}.jpg".format( path, scName, cam, curFrame, ts )

# Create path if it doesn't exist
if not os.path.exists( path ):
    os.makedirs(path)

# run playblast for current viewport
cmds.playblast( fr=curFrame, v=False, fmt="image", c="jpg", orn=False, cf=fullPath, wh=[width,height], p=100 )

# log path to console for reference
print('Snapshot saved as: ' + fullPath )

# show popup message in viewport
cmds.inViewMessage( amg='<span style="color:#82C99A;">Snapshot saved</span> for <hl>' + cam + '</hl> in <hl>' + scName + '<hl> at frame <hl>' + str(curFrame) + '</hl>', pos='topRight', fade=True, fst=3000 )
Code Overview
This section should rapidly get you up to speed on what the script does.
Image Dimensions
# set screenshot dimensions
width = 960
height = 540For convenience, the image dimensions are placed at the top. Here you can specify the width and height of the playblast image.
Note: The size of the image is capped at the width and height set in the scene's Render Settings panel. The default is 960 x 540.
Panels and cameras
Since the playblast command renders the active panel, we have to check whether the active panel is actually a viewport. The technical name for a viewport in Maya is: modelPanel.
# throw error if active panel is not a viewport
if "modelPanel" not in cmds.getPanel(typeOf=panel):modelPanel.If we have the correct panel we can then retrieve the active camera.
# get name of current camera
cam = cmds.modelEditor( panel, query=True, camera=True )Further reading
getPanelDocumentation- Code examples: working with panels and cameras
- Documentation for Windows and Panels in Maya
Working with Files and Paths
The file command is used to read the scene name and path. Using the shn flag we retrieve only the scene name, excluding the path.
# get name of current file
scName = cmds.file(query=True, sn=True, shn=True)

# get full path of current file
scPath = cmds.file(query=True, sn=True)Here is the documentation for the file command.
We can then customize the folder path. In our case we added -prv/.
# set new path where previews will be saved to
path = scPath + "-prv/"Our folder path is then passed to the makedirs command to create the actual folder - right next to the scene file.
os.makedirs(path)The full path will instead be specified in the playblast command to define the image output.
# construct full path
fullPath = "{}{}-{}-f{}-{}.jpg".format(path, scName, cam, curFrame, ts)Note: We used the .jpg extension. Make sure to change this if you specify a different output image format in the playblast command.
Playblast Command
A playblast is simply a preview generated from the active viewport. The tool is accessible from Windows > Playblast in Maya. By default it takes the settings from the Render Settings > Common Tab. We can override those settings using custom flags/options.
# run playblast for current viewport
cmds.playblast(fr=curFrame, v=False, fmt="image", c="jpg", orn=False, cf=fullPath, wh=[width,height], p=100)

'''
fr: frame range
v: launches a viewer, like a 'fcheck', for images - once the render is done.
fmt: format
	fmt="movie"
    fmt="image"
c: compression
	c="none": .iff
    omitted: will use render settings.
orn: Show the viewport ornaments (any HUD items). On by default.
cf: complete filename. There is also the f (filename) flag for specifying just
	the filename and use the default path set in the Render Settings.
p: Percentage of viewport. This scales the output unless set to 100%.
	Default is 50% (half resolution).
'''
playblast command and flags reference.Further Reading
- For a list of all available flags see:
playblastcommand documentation - Playblast reference
Logging and Messages
To provide feedback or error messages there are a few options available. For the alert popup error message we used the confirmDialog command.
Popup Error Message
cmds.confirmDialog(title='Error!', message='Please select a viewport panel first.', button=['Ok'], defaultButton='Ok', dismissString='No')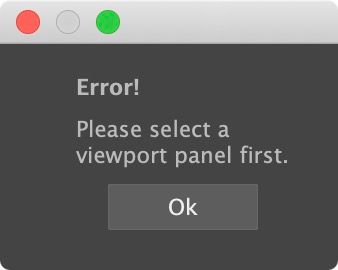
confirmDialog popup.Further Reading
confirmDialogcommand documentation- Additionally, the
promptDialogoffers a text field for user input:promptDialogcommand documentation
Logging to the Script Editor Console
We can simply use the print() command to output a message in the Script Editor console.
# log path to console for reference
print('Snapshot saved as: ' + fullPath)
Viewport Messages
Additionally we can have messages popup in the active viewport. Maya offers a command for that: inViewMessage.
# show popup message in viewport
cmds.inViewMessage(amg='<span style="color:#82C99A;">Snapshot saved</span> for <hl>' + cam + '</hl> in <hl>' + scName + '<hl> at frame <hl>' + str(curFrame) + '</hl>', pos='topRight', fade=True, fst=3000)

'''
amg: message to be displayed. Allows for some HTML tags.
	In our case we used <span> so we could assign a custom color.
    The <hl> tag is not an HTML tag but is handled as one - it
    highlights the contained text.
fade: allows message to fade out.
fst: Fade Stay Time - how long the image stays at max opacity (milliseconds).

pos: position of the message in the viewport.

   "topLeft"
   "topCenter"
   "topRight"
   "midLeft"
   "midCenter"
   "midCenterTop"
   "midCenterBot"
   "midRight"
   "botLeft"
   "botCenter"
   "botRight"

'''
inViewMessage example and flag reference.Note: Remember to convert Numbers to Strings when concatenating text. You can use the str() command but it is usually best to use String Formatting
Further Reading
inViewMessagecommand documentation- Tips for using the
inViewMEssagecommand, including supported HTML tags
Creating Shelf Items
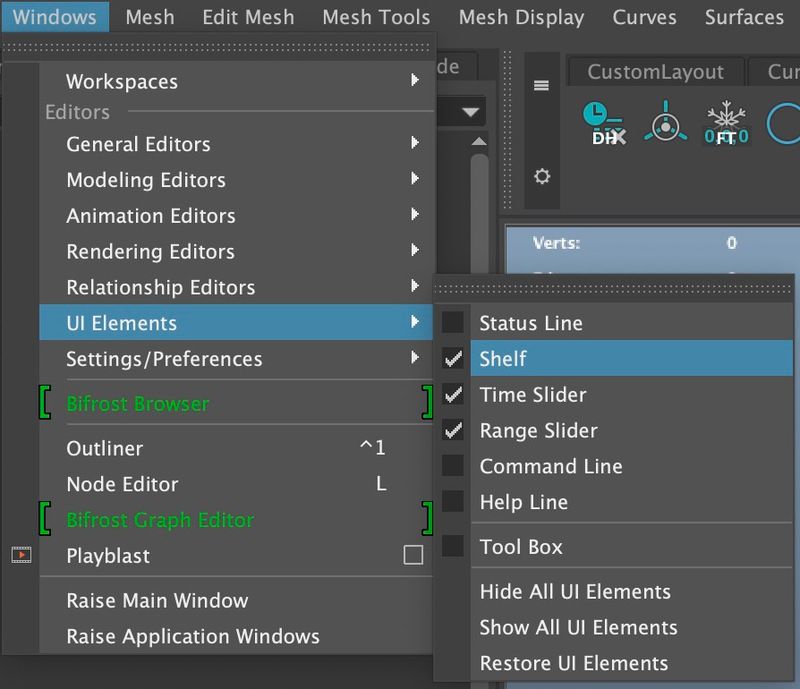
First make sure you have the shelf enabled. You can turn it on here: Windows > UI Elements > Shelf.
With the shelf open, locate the settings cog icon and choose the shelf editor...
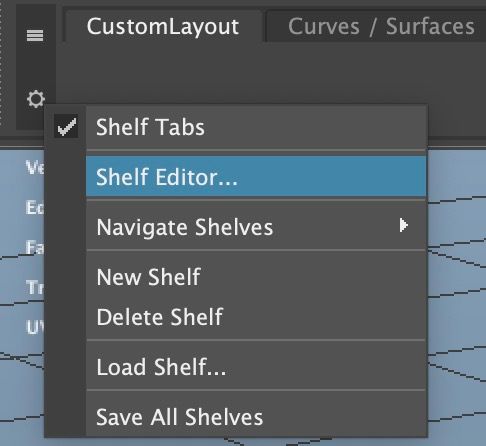
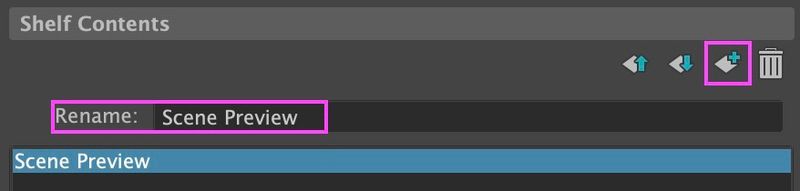
In the shelf editor you can create a new shelf or add a new item to an existing one. To add a new item simply choose the new item button and rename the shelf item.
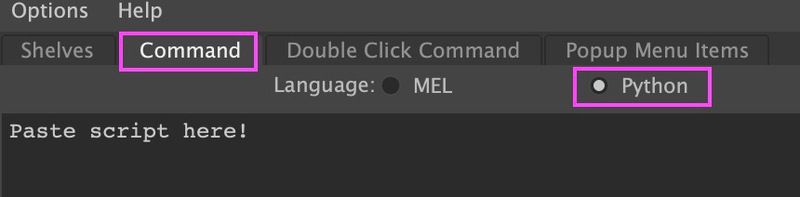
Head over to the Command tab, select Python as the source language and paste in the script.
Note: The shelf items are automatically saved for the current scene when you make changes. You may want to ensure the shelves are saved to the Maya preferences by manually choosing the Save All Shelves button.
Customizing Shelf Items
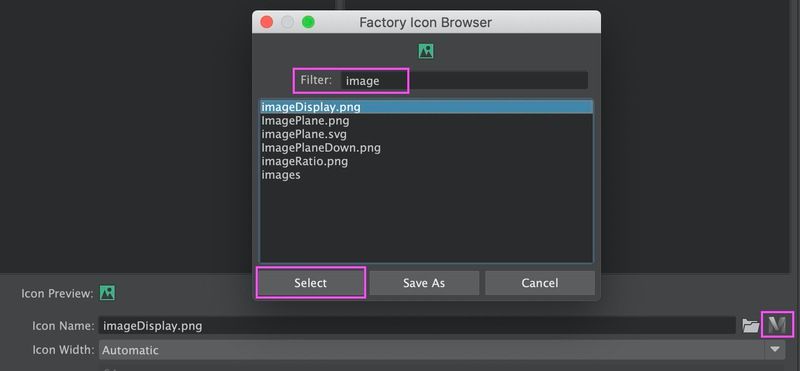
You can customize the look by choosing an icon. You can upload or choose one from the built in factory icons.
Write a description of what the shelf item does in the Tooltip field.


Further Reading
Additional Resources